Monday, October 21, 2019

Scrap Quilt Tutorial


I have not been active on this blog for quite some time. An occasional post here and there but nothing regular. I retired a few months ago and I am hoping to get back into posting now. So this is my start.

This past week my niece sent me a picture of a scrappy quilt that someone had posted on Facebook because she thought it looked like something I would make. She was right! It is a great quilt that uses lots of scraps and doesn't need a background or neutral fabric to go with the scraps. 

Unfortunately, it was just a picture with no information about the pattern name or who designed it. I have contacted the original poster to see if I can get that information but that could be a few more days (once I get that information I will update this post to let you know). I really don't have much patience when it comes to quilts so I decided I would figure out how to make it on my own. 

It really is quite an easy pattern so it only took me a short time to have two blocks made: 
  
The blocks turned out as expected but I went too small with the pieces so the small center triangles were just too wee. For the tutorial I went a bit bigger. 

I shared the original picture along with this one with some Facebook friends who I am doing a challenge with and there was interest in the quilt and how to make the blocks so I am doing a tutorial...

So cutting for this block is really simple. There are only two sizes of pieces for the blocks. The smaller rectangle is 2" X 6.5" and the larger is 5" X 6.5". You will need 8 of each piece to make the two blocks. When cutting for a full quilt you will need to determine how many blocks you want to make and then multiply that by 8 to determine how many pieces you will need. 

 Match up the 8 pairs of pieces and sew them together.
Press half of the sections toward the small piece and half to the large piece. These blocks will be 6.5" square.
Draw a diagonal line from corner to corner on one of those piles.
Match up each of the marked pieces with one of the unmarked ones, nesting the seams.
Sew one quarter inch on either side of the mark.
Cut on the line. 
Press the seams. I prefer to press them open when working with triangles to avoid bulky seams.
You will have two different types of squares.
Trim the squares so they are all the same size. Mine ended up 5 7/8" but I was using a sewing machine without a 1/4" foot so my seam were a little wide I think. I think it could have been 6". When you are trimming them it is important to make sure that the narrow strip and small triangles are all the same size as that is the seam you will want to match up.
Lay the squares out to make the two different blocks and sew them together
I would recommend 'spinning' or 'swirling' your seams when you press them to make it easier when putting the quilt together.

When I make more blocks for a full quilt I will mix the pieced squares for more variety.

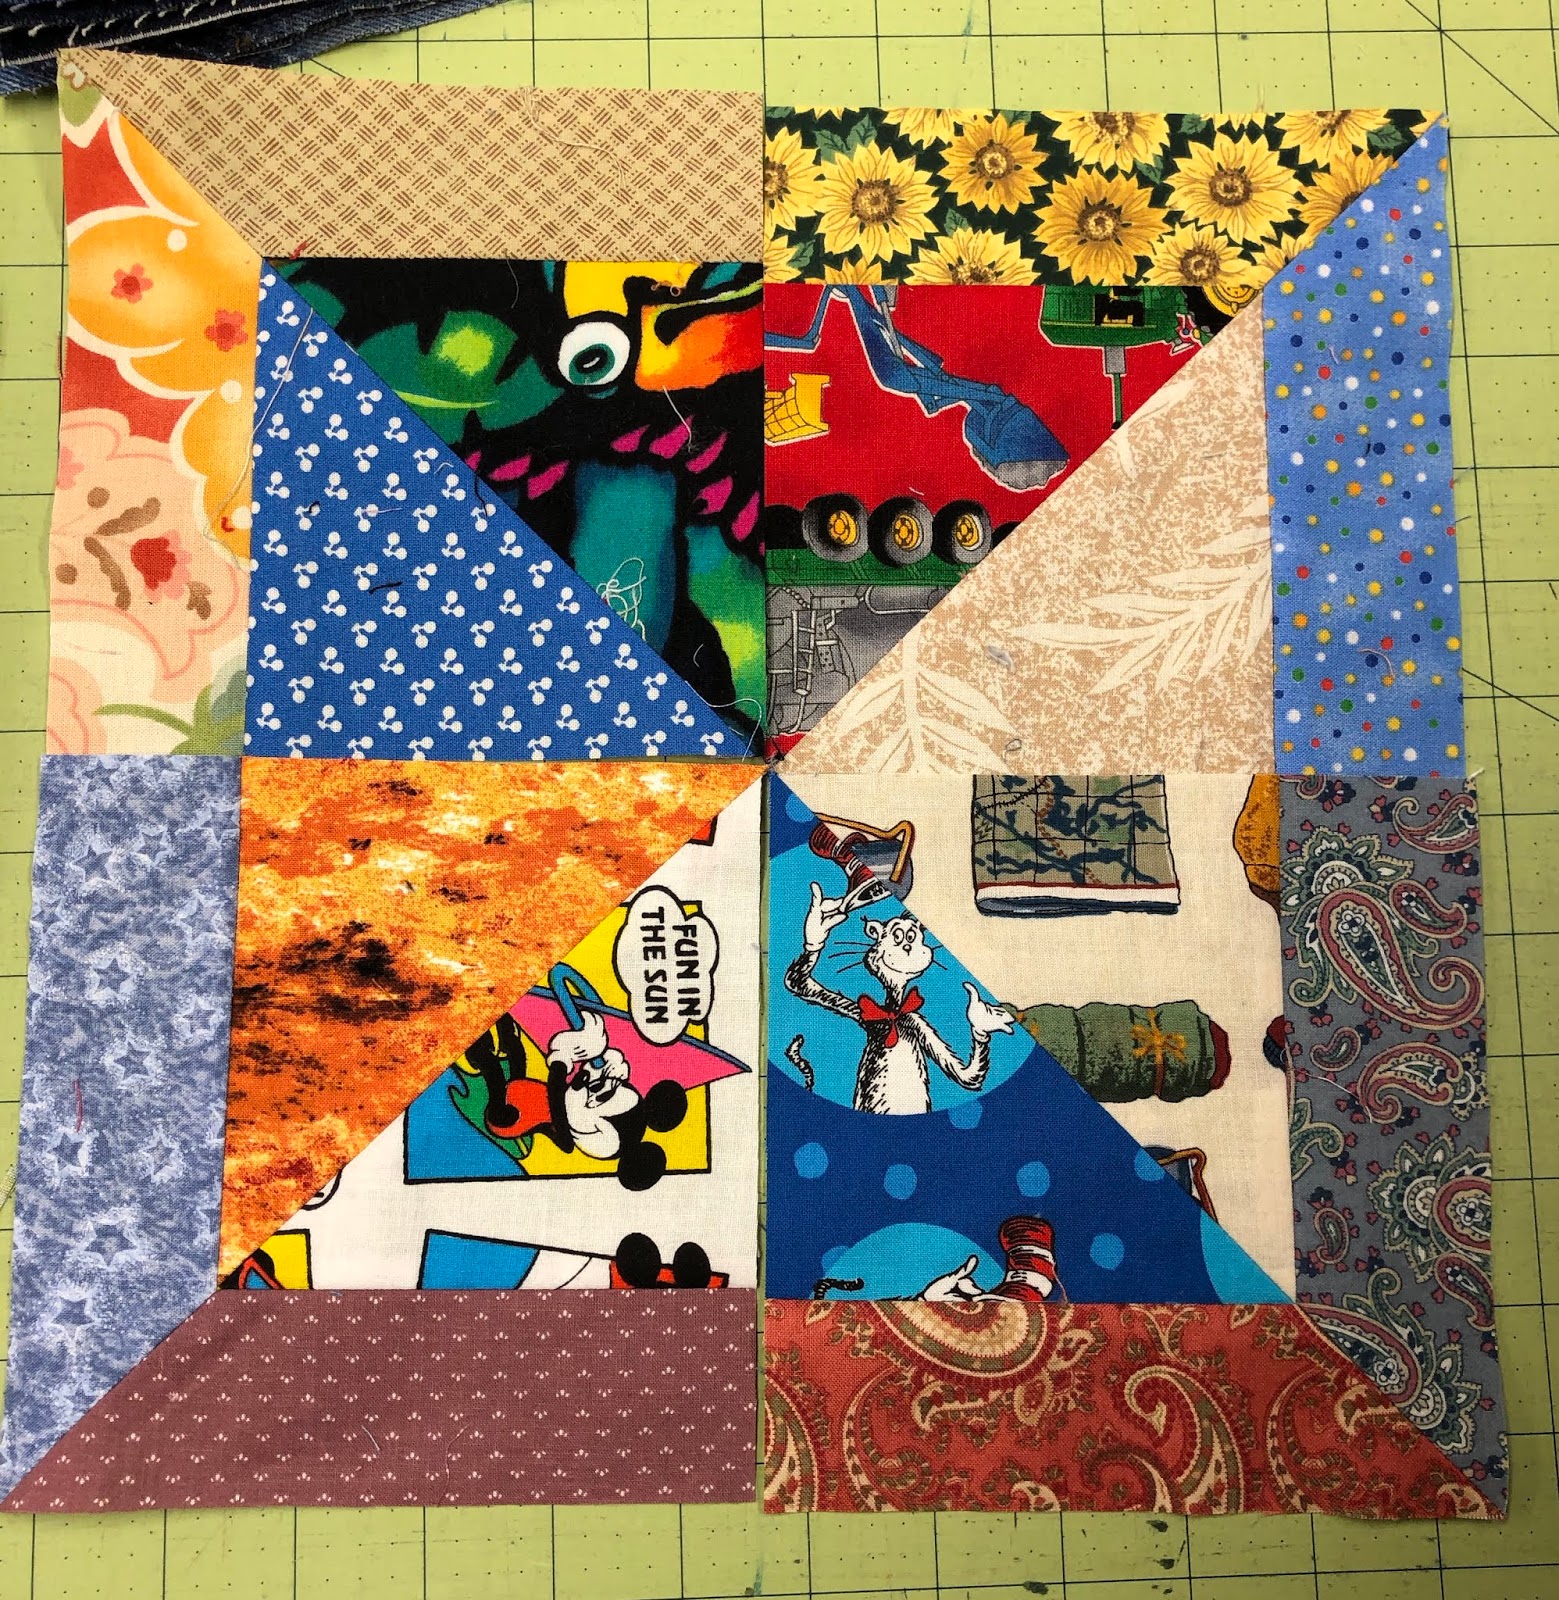
Using the measurements given you will end up with 11" finished blocks. You can also make it using 2.5" X 8.5" and 6.5" X 8.5" pieces and your blocks will end up more like 15-16" finished. (The first two blocks I made used 1.5" X 4.5" and 3.5" X 4.5" pieces.)

Hope this makes sense and I am looking forward to getting back to writing and sharing more about my sewing, grandkids, travels, garden, etc.


Monday, January 9, 2017

Another Year is Starting

I haven't posted in over a year! I should be ashamed but life has just taken over! I did start a post in June and another in October. Here is an edited and added to version of those. 

Obviously, my resolutions fell by the wayside once again. I have spent a little more time in the sewing room but not a lot. That little boy is just more interesting than sewing most of the time! Hard to resist him. 

In January I had the metal plates and screws taken out of my ankle as they seemed to be causing me discomfort and loss of motion. The surgery went well and everything would have been great but the whole family then came down with a stomach bug for several days and it also went through the staff at the church/daycare where I work. Everyone's health improved eventually but it meant for some long days at work.

In February we had a few nice days and I was inspired to order some metal raised beds for my garden. Unfortunately the weather seemed to work against me and I didn't get them put together until mid April. I love them and have more to put together when we get some time this fall/winter so they are ready for next spring. We had a strange growing season this year where some things did really well (apples, strawberries, raspberries) and other not so well (carrots, squash). I look forward to seeing what next year will bring.

On April 1, my husband and I celebrated our 34th anniversary on a jet, heading for China. We spent 2 weeks with our son seeing the Great Wall, Summer Palace and Ming Tombs in Beijing, the Terra Cotta Warriors in Xian, the pandas in Chengdu along with many other sights. Jakob left for China Sept 1, 2015 for a year to teach ESL in Chengdu. When we got there we found out he was applying for and has since been accepted to and started grad school at a university there. We had an amazing trip and a wonderful time with Jakob. I don't know what I expected but China was totally different from any place I have ever been.  

Thanks to his sister, my husband has been 'inspired' to create a new sewing space for me. He is even willing to give up some of his space in the garage for it! He spent a month or so emptying his 'treasures' from the lean-to--a dirt floored area that started out as a place to feed the cows more than 50 years ago. Then it needed a new foundation and the building began. It was a group project with help from my oldest daughter and her husband as they sold their home in Idaho and moved to this side of Washington in June. Their incentive was being able to move into the house once my sewing stuff moved out. I was moved out there in October and love it! I even made several Christmas gifts in those two months!


It was a wild six months with 4 extra people, one extra dog and two cats around. They found a house only about 7 miles from us and moved in officially on Christmas Eve. We even all celebrated Christmas at their house the next day. 

The new year has begun and I am fighting a bad cold thing which might be a version of the flu but I am hoping to be over it soon as my husband and I head to Nicaragua in just 4 days for a medical mission trip. 

I hope the new year finds you all healthy and busy in  your sewing spaces and I will leave you with some pictures from my year.


My 11 year old grandson doing some hand sewing.

8 year old grandaughter sewing
some squares together on the machine.

2 1/2 year old grandson using his
'rotary cutter' at the cutting table.

One of my first sewing projects in the new space.
Made from leftover triangles from my daughter's project .

Oldest daughter working on a quilt.

Daughter at the machine.

My first grouping of raised beds - more to be added this spring.

Creating the forms for the foundation of my sewing space.

Partially framed

Adding insulation

From the outside

Helping build cabinets

Fabric all sorted in the drawers.

Fabric storage with old sewing machines for decoration.

Quilting machine and shelf made by my dad to hold
my mom's cigar box notion organizers. I inherited both!

Sewing table made by my husband to wrap around
my Sew-Ezi table using treadle cabinet drawers.

Cutting Table with storage shelf underneath


Other end of the cutting table with my ironing board on it. 

My husband looking out of Great Wall

Panda in Chengdu

My son's birthday dinner with friends.

Terra Cotta Warriors - this place is massive!

Just beautiful. Someday I will make a quilt inspired by this.

In front of the Wild Goose Pagoda in Xian.

Ancient irrigation project near Chengdu

Our son and his Chinese 'family'
Little Robert is one of his students.


Sunday, January 3, 2016

New Year, New Start

As we begin a new year, I have resolved that I need to spend more time in my sewing room and also more time sharing what I do in the sewing room with those that read my blog. 

To be able to spend more time in my sewing room I needed to figure out how to spend less time on my computer and the first change is that I have put my stained glass denim quilt pattern on Etsy. In my last post I estimated that I had sent the pattern out to more than 2000 quilters. That number has increased markedly with the advent of Pinterest and Facebook. There are day I get 30-50 emails or comments on my blog. Add to that the fact that I am working close to full time and I want to spend time with my grandson and other family members and you might see why I had to come up with a more automated method of sharing the pattern. Etsy seemed like the right answer. I will still be available via email to people who have questions as they use the pattern and would still love to get pictures and most importantly, I will still be giving most of the money received from the pattern to charity. 

I have had a couple people who have been upset with me because of the change but I have to make the decision based on me, not them.

So if you are interested in getting a copy of the pattern go to my Etsy shop and add the pattern to your cart!

Saturday, May 23, 2015

Denim Update


******Important Update: As of December 31, 2015 this pattern will be available only in my Etsy Shop - LucysQuilts******


On Saturday, December 12, 2009, I wrote a post on this blog about the denim quilts I have made. I have been amazed at the number of quilters who wanted the pattern. As Facebook gained popularity with some of us 'older folks' and Pinterest took off that number just kept going up. At first it was a few people a month who either emailed me or left a comment with their email address, then a few a week. Then I was asked by Marina and Daryl at Quilt Inspiration if they could do a post and they did. Then things really picked up! There would be days when I got 10 or more and I knew that someone new had pinned a picture on Pinterest. About a week ago someone posted a photo on the Quilt Along with Pat Sloan Facebook Group page and requests shot up once again. I was looking for the picture thread there today though and it seems to have been deleted. Not sure what that is about.

Anyway, since 2009 I have gotten over 1100 comments on the blog post and probably at least another 1000 emails with requests for the pattern. Which means I have sent the pattern to more than 2000 quilters in the us and around the world! Crazy, to think about! 

Unfortunately, some comments did not include an email address so I was unable to fulfill the requests. I also moderate comments as I was getting a lot of spam. Because of this there is a delay before a comment is posted so some people commented more than once thinking it didn't work. I usually only publish one comment per person in those cases. Also, if you don't want your inbox filled with comments from other folks make sure you check your settings.

I have changed the pattern slightly over the years and my latest version has a new size added to it (60" X 80"). I have tried to add more information to the pattern to answer some of the questions I have received from folks over the years. The most commonly asked questions is whether you should add seam allowance to the measurements I have given and the answer is a resounding NO! It is included in the 2", 4", 6", etc. Also, the strips ARE cut 1" wide.

I had never charged for the pattern, but I have given folks information about making donations to a couple of charities. Beginning in January or 2016 the pattern has been available from my Etsy shop: LucysQuilts as I found myself spending more time sending out the pattern than doing anything creative. The proceeds from the pattern all go to charity still.  

In March, when my husband and I took our two oldest grandchildren to the east coast we were able to visit one of the LWR warehouses in Maryland and the kids were able to watch as they squished quilts and wrapped them in bales to prepare them for shipping.
The quilt folding area and pallets
with bales of quilts.
Almost done making a bale.
Folding the quilts to be baled.
Weighing a bale.


Here is a link if you are interested in learning more or would like to donate go to lwr.org. 

In the email that I send out with the pattern I also have asked quilters to send me pictures of quilts they have made using the pattern and here are..
A two-piece cover for the couch
in Marilyn's motor home.

Rhoda in South Dakota made this
one along with the next two.
Made from Crown Royal bags

From Karin in the UK. She said that she enjoyed cutting the pieces and figuring out the layout but the quilting was a bit daunting so she put it in the cupboard for a while to percolate and then finished it in one day!
The quilting is fun on this one by Virginia
Birgit's version
She added rows to make it larger.
This one is from Judith.
This one is from Michelle
who added an extra row
to make it long enough
for her son.
From Cindy
Memory Quilt made by Glenda
Becky made this for a raffle.
She wasn't happy with the way it
turned out but I think it is great!
This is one started at the class
I did for my quilt guild.
This one has wider sashing.
Becky did it as a Quilt As You Go.
Here is a shot of the back
Susan used decorative stitching
for the quilting on the strips
on this test sample.
Phyllis used a maroonish red for the strips

Linda made this for
her granddaughter, Amanda.
Phil did this larger adaptation,
saying, "the quilt was surprisingly
easier than I expected it to be."
This one is a work in progress
from a first time quilter.
Jackie made this for her grandson.
 I think he likes it.
Sandra added extra rows
and used red for sashing.
From Jennifer
Can you see the darker 'bat' shape in there? 
This is Susan from Australia
showing the quilt she made
for her son using his jeans.
Mary made this king size top

using some added bits of lace and 

some buttons along with blocks 

from various embroidered 

denim shirts, jackets and jumpers.
Melissa made this one
and embroidered a squirrel,
her god-daughter's name
and her college name.
Ann made this one using
platinum strips and added
some pillow shams for her son.


This is Theresa's WIP for her
daughter with an Americana theme.

These pictures really show the versatility of this pattern! I am currently working (when I get a chance) on using up all the denim I have. I am guessing I have enough to make 10-20 or more quilts using the new 60" X 80" pattern.

So, if after reading this update you want the updated pattern, either comment and give me your email address or click on View My Profile on the right and then click on Email Me on the left you can go to my Etsy shop: LucysQuilts and order the pattern. All income from this pattern goes to charity.